A .sparseimage file is a type of disk image format commonly used on macOS systems. It is a compressed file that contains the complete contents and structure of a disk volume, such as a hard drive or a partition. These files are often used for creating backups, transferring data between systems, or distributing software applications.
In many cases, users might need to access or extract the contents of a .sparseimage file on a Windows operating system. This could be due to various reasons, such as switching from a Mac to a Windows computer, collaborating with colleagues who use different platforms, or needing to access data stored in a .sparseimage file format.
This guide will cover four different methods for how to open sparseimage Windows:
- Using HFSExplorer
- Using TransMac
- Using 7-Zip with additional plugins
- Using DMG Extractor
Each method will be explained in detail, including step-by-step instructions, pros and cons, and any necessary software downloads. Additionally, we will provide troubleshooting tips and solutions for common issues that users might encounter when working with .sparseimage files on Windows.
What are Sparseimage Files?
A sparseimage file, often represented by the .sparseimage extension, is a disk image format commonly used on macOS systems. It is a type of sparse file that efficiently stores data by avoiding the allocation of space for empty or unused portions of the disk image. This format is particularly useful when creating disk images for backup purposes, as it allows for the compression of empty spaces, resulting in smaller file sizes and more efficient storage.
Sparseimage files are commonly used in various scenarios, such as:
- System Backups: macOS provides built-in tools like Time Machine that create sparseimage files for backing up the entire system or specific volumes. These backups can be used for data recovery or migration to a new Mac.
- Virtual Machine Disk Images: Virtualization software like Parallels Desktop and VMware Fusion often use sparseimage files as virtual disk images for running different operating systems within a virtual machine on a Mac.
- Software Installers: Some software installers on macOS are distributed as sparseimage files, which can be mounted as virtual disks and used for installation purposes.
Unlike other disk image formats like ISO or DMG, sparseimage files are specifically designed for macOS and utilize the HFS+ (Hierarchical File System Plus) file system. This file system is optimized for macOS and provides features like case-insensitivity, extended metadata, and efficient storage management.
While sparseimage files are native to macOS, they can be challenging to work with on other operating systems like Windows. Windows does not natively support the HFS+ file system or the sparseimage format, which can make it difficult to access or extract the contents of these files. However, there are third-party tools and utilities available that can help bridge this gap, allowing Windows users to open and work with sparseimage files.
How To Open Sparseimage Windows
Using HFSExplorer

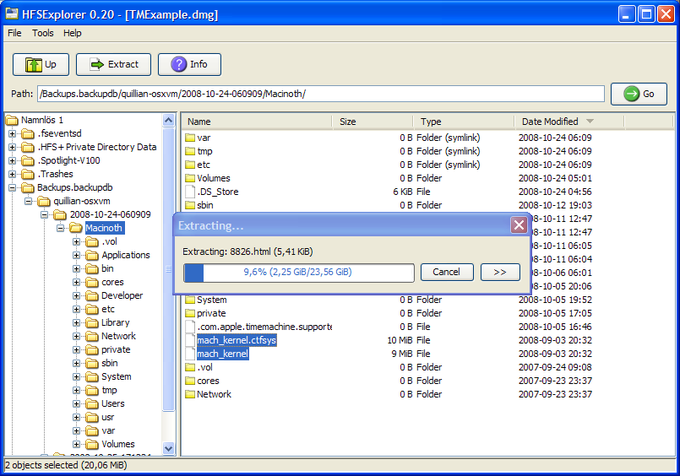
HFSExplorer is a free and open-source utility that allows you to browse and extract files from various disk image formats, including .sparseimage files. It’s a popular choice among Windows users who need to access macOS disk images.
Downloading and Installing HFSExplorer
- Visit the official HFSExplorer website at https://www.fs-driver.org/.
- Scroll down to the “Download HFSExplorer” section and click on the download link for the latest version.
- Once the download is complete, run the installer file and follow the on-screen instructions to install HFSExplorer on your Windows machine.
Step-by-Step Guide to Using HFSExplorer
- Launch HFSExplorer on your Windows computer.
- In the HFSExplorer window, click on “File” in the top menu, and then select “Load File System From File.”
- Navigate to the location where your .sparseimage file is stored, select the file, and click “Open.”
- HFSExplorer will load the contents of the .sparseimage file, allowing you to browse and extract the files and folders within it.
- To extract files or folders, simply right-click on them and select “Extract” or “Extract To,” then choose the desired location on your Windows machine.
Pros and Cons of Using HFSExplorer
Pros:
- Free and open-source software
- Supports a wide range of disk image formats, including .sparseimage
- Simple and user-friendly interface
- Allows you to browse and extract files from disk images
Cons:
- Limited functionality compared to some paid alternatives
- May not support the latest disk image formats or macOS versions
- Occasional bugs or compatibility issues with certain disk images
HFSExplorer is a reliable and straightforward solution for accessing .sparseimage files on Windows. While it may lack some advanced features, its simplicity and compatibility make it a popular choice for many users.
Using TransMac

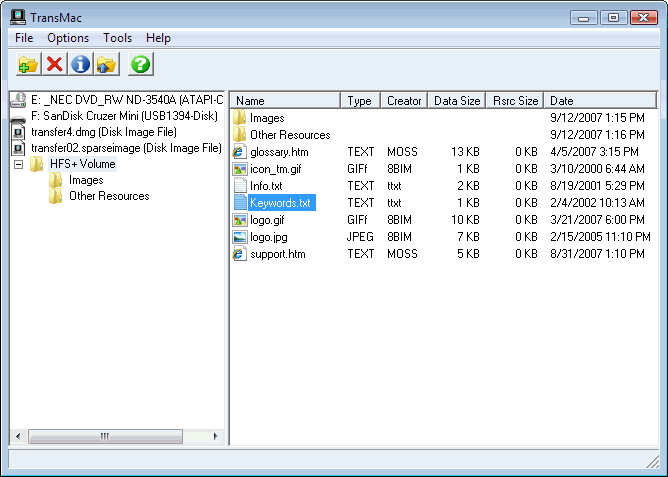
TransMac is a powerful software utility designed to provide seamless integration between macOS and Windows operating systems. It allows users to read, write, and manipulate various macOS disk image formats, including .sparseimage files, directly on their Windows machines.
Downloading and Installing TransMac
- Visit the official TransMac website at https://www.aczion.com/products/transmac.
- Click on the “Download” button to obtain the latest version of TransMac for Windows.
- Once the download is complete, run the installer file and follow the on-screen instructions to complete the installation process.
- After the installation is finished, launch TransMac from the Start menu or desktop shortcut.
Step-by-Step Guide
- In the TransMac application, click on the “Open” button or go to the “File” menu and select “Open.”
- Navigate to the location where your .sparseimage file is stored and select it.
- TransMac will prompt you to select a mount point, which is essentially a virtual drive letter where the disk image will be mounted.
- Choose an available drive letter from the list and click “OK.”
- TransMac will mount the .sparseimage file as a virtual drive, allowing you to access its contents like any other drive on your Windows system.
- You can now navigate to the mounted drive using File Explorer and access the files and folders within the .sparseimage file.
- Once you’re done, right-click on the mounted drive in TransMac and select “Unmount” to safely eject the disk image.
Pros and Cons
Pros:
- Seamless integration with Windows, allowing you to access macOS disk images without any additional steps.
- User-friendly interface that makes it easy to mount and unmount disk images.
- Supports a wide range of macOS disk image formats, including .sparseimage, .dmg, .iso, and more.
- Provides read and write access to the mounted disk images, enabling you to modify files if needed.
- Offers additional features like creating and formatting disk images, encrypting disk images, and more.
Cons:
- TransMac is a paid software, which may not be suitable for users on a tight budget or those who only need occasional access to .sparseimage files.
- The software may require periodic updates to ensure compatibility with the latest macOS and Windows versions.
- Some advanced features or customization options may require a steeper learning curve for less tech-savvy users.
TransMac offers a robust and user-friendly solution for accessing .sparseimage files on Windows systems. While it comes with a cost, its comprehensive feature set and seamless integration make it a valuable tool for users who frequently work with macOS disk images on their Windows machines.
Using 7-Zip with Additional Plugins

One of the more versatile and powerful methods to open .sparseimage files on Windows is by using the popular open-source file archiver, 7-Zip, in combination with additional plugins. While 7-Zip doesn’t natively support .sparseimage files, you can extend its functionality by installing third-party plugins that add support for this file format.
Downloading and Installing 7-Zip
The first step is to download and install the latest version of 7-Zip from the official website (www.7-zip.org). The installation process is straightforward and should only take a few minutes. Once installed, you can access 7-Zip from the Start menu or by right-clicking on any file or folder and selecting the appropriate option from the context menu.
Installing Plugins for .sparseimage Support
After installing 7-Zip, you’ll need to download and install the necessary plugins to add support for .sparseimage files. One popular plugin is the “HFSExplorer” plugin, which you can find on various software repositories or developer websites. Once downloaded, you can install the plugin by following the provided instructions, which typically involve copying the plugin files to the appropriate directory within the 7-Zip installation folder.
Extracting .sparseimage Files with 7-Zip
With the plugins installed, you can now use 7-Zip to open and extract the contents of .sparseimage files. Right-click on the .sparseimage file and select “7-Zip” > “Open archive” from the context menu. 7-Zip will recognize the file format and allow you to browse and extract the contents of the disk image.
You can also use 7-Zip’s built-in extraction tools to extract the entire contents of the .sparseimage file to a specified location on your hard drive. This can be useful if you need to access multiple files or folders within the disk image.
Pros and Cons of Using 7-Zip
Pros:
- Free and open-source software
- Highly versatile and supports a wide range of file formats
- Allows you to extract individual files or the entire disk image
- Lightweight and efficient
Cons:
- Requires additional plugins to support .sparseimage files
- Plugin installation and configuration can be complex for some users
- Limited graphical user interface compared to dedicated disk image tools
Using 7-Zip with the appropriate plugins can be an effective and cost-effective solution for opening and extracting .sparseimage files on Windows. However, it may require some additional technical knowledge and effort to set up and configure the necessary plugins.
Using DMG Extractor

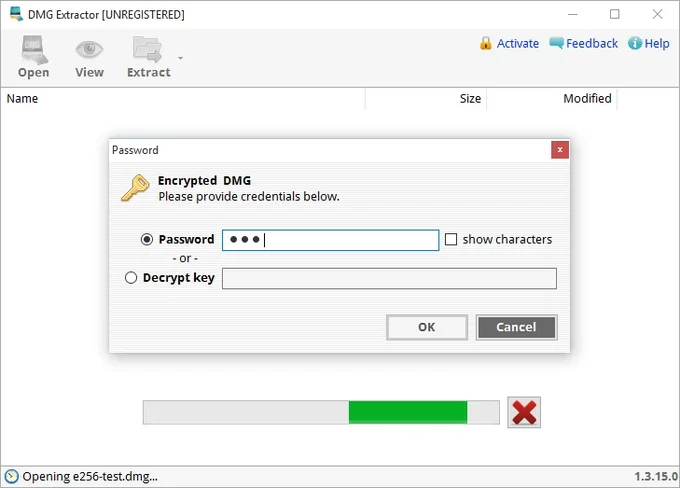
DMG Extractor is a free and open-source utility designed specifically for opening and extracting various disk image formats, including .sparseimage files. It provides a simple and straightforward solution for Windows users who need to access the contents of these files.
Downloading and Installing DMG Extractor
- Visit the official DMG Extractor website at https://dmgextractor.info/.
- Click on the “Download” button to obtain the latest version of the software.
- Run the downloaded executable file and follow the on-screen instructions to complete the installation process.
Opening Sparseimage Files with DMG Extractor
- Once DMG Extractor is installed, locate the .sparseimage file you want to open.
- Right-click on the file and select “Open with” from the context menu.
- Choose “DMG Extractor” from the list of available programs.
- DMG Extractor will launch and begin the process of extracting the contents of the .sparseimage file.
- Once the extraction is complete, you can navigate to the output folder and access the files and folders contained within the .sparseimage file.
Pros and Cons of using DMG Extractor
Pros
- Free and open-source software, making it a cost-effective solution.
- Simple and user-friendly interface, making it easy for beginners to use.
- Supports various disk image formats, including .sparseimage, .dmg, .iso, and more.
- Lightweight and efficient, with a minimal impact on system resources.
Cons
- Limited functionality compared to more comprehensive disk image management tools.
- May not support the latest or uncommon disk image formats.
- Lacks advanced features like disk mounting or partition management.
- User interface could be improved for a more intuitive experience.
DMG Extractor is a straightforward and reliable option for Windows users who need to open and extract .sparseimage files. While it may lack advanced features, its simplicity and ease of use make it a viable choice for basic disk image extraction tasks.
Troubleshooting Common Issues
Opening .sparseimage files on Windows can sometimes present challenges, even with the various methods and tools available. Here are some common issues you might encounter and tips to help you troubleshoot them:
Incorrect File Associations
In some cases, your Windows system might not recognize the .sparseimage file format, leading to errors or the inability to open the file. To fix this, you can try manually associating the file extension with the appropriate program or tool, such as HFSExplorer, TransMac, or 7-Zip.
Permissions and Access Restrictions
If you’re having trouble accessing or extracting the contents of a .sparseimage file, it could be due to file permissions or access restrictions. Try running the program or tool you’re using with administrative privileges or check the file’s permissions and ownership settings.
Corrupted or Incomplete Files
Occasionally, .sparseimage files can become corrupted or incomplete during the transfer or download process. If you suspect this is the case, try downloading or transferring the file again from a reliable source. You can also use file integrity checking tools to verify the file’s completeness.
Compatibility Issues
While the methods and tools mentioned in this guide are generally reliable, compatibility issues can sometimes arise due to differences in operating system versions or software updates. If you encounter compatibility problems, try updating the software to the latest version or check the developer’s support forums for known issues and workarounds.
Seek Additional Help
If you’ve tried all the troubleshooting steps and are still unable to open or access your .sparseimage file, don’t hesitate to seek additional help. Many online forums and communities are dedicated to file format issues and cross-platform compatibility. Posting your specific problem and providing relevant details can help you find a solution from experienced users or experts.
Remember, troubleshooting can be a process of trial and error, but with patience and persistence, you should be able to overcome any obstacles and successfully access your .sparseimage files on your Windows system.
Conclusion
In this comprehensive guide, we’ve explored four different methods to open and access .sparseimage files on Windows operating systems. Each method has its own strengths and weaknesses, and the best approach for you will depend on your specific needs and preferences.
If you’re looking for a straightforward and user-friendly solution, HFSExplorer and TransMac are excellent choices. These dedicated applications are designed specifically for working with macOS disk image formats, including .sparseimage files, and they offer a seamless experience with minimal setup required.
On the other hand, if you prefer a more versatile and customizable approach, using 7-Zip with additional plugins or DMG Extractor can be a great option. While these methods may require a bit more setup and configuration, they provide flexibility and can be used for various other file formats and tasks.
Regardless of the method you choose, we encourage you to give it a try and experiment with the different options. Don’t hesitate to refer back to the step-by-step instructions provided in this guide, and feel free to share your experiences, successes, or any challenges you may encounter in the comments section below.
Remember, accessing cross-platform file formats can be a daunting task, but with the right tools and guidance, it becomes a manageable task. By following the methods outlined in this guide, you’ll be well-equipped to open and extract the contents of .sparseimage files on your Windows machine, ensuring seamless access to your data across different operating systems.
Call to Action
We hope this comprehensive guide has provided you with the tools and knowledge needed to open and access .sparseimage files on your Windows machine. Whether you’re an IT professional, a tech enthusiast, or simply someone who needs to access these files for work or personal reasons, the methods outlined in this article should have you covered.
If you’ve tried any of the methods described, we encourage you to share your experiences and feedback in the comments section below. Let us know which approach worked best for you, or if you encountered any challenges along the way. Your insights can help others in similar situations and contribute to the ongoing discussion around cross-platform file accessibility.
Additionally, we invite you to subscribe to our newsletter to stay up-to-date with the latest tech tips, guides, and industry news. By subscribing, you’ll receive regular updates and insights straight to your inbox, ensuring you never miss out on valuable information that can help streamline your workflow and enhance your tech-savvy skills.
Finally, if you haven’t already, we recommend downloading the software tools mentioned in this article, such as HFSExplorer, TransMac, 7-Zip, and DMG Extractor. Having these tools at your disposal can make opening and extracting .sparseimage files a breeze, saving you time and effort in the long run.


